Here comes the sibling: Meopta Openar 20 mm 1:1.8. It's a c-mount lens I got with Meopta Admira 16 A1 Electric film camera, which was (according to Wikipedia) manufactured in '60s. It makes it ca. 50 years old lens! Unfortunately the camera itself wasn't in it's best and I plan to revitalize it.
Lens is a bit shorter than Openar 40/1.8 and about the same in diameter. Glass elements inside are mounted deeply, which gives lens a built-in hood. That's a very good solution according to what you're about to see.
 |
| A set of Meopta c-mount lenses: Meopta Openar 20/1.8 Meopta Openar 40/1.8 Meopta Openar 80/2.8 |
 |
| Meopta Openar 20/1.8 - front lens (lens hood from Openar 80/2.8). |
Focusing (ergonomics)
When using Lumix G2 with a c-mount > Micro Four Thirds adapter, focusing ring is very close to the camera body, which makes it harder than usually to focus (especially in gloves!). However, it's still available and manageable to aim your target.
Most usually my first move was to revolve aperture ring instead of focusing.
Aperture
Aperture is pentagonal, built with 5 leaves. It's slightly star-shaped with dent-in edges, but even on every setting. When increasing apertures value star-shape disappears in favour of regular pentagon.
Coverage, vignetting and image quality
I decided to begin with these samples due to the fact that aperture affects image quality a lot. It was designed for much smaller 16 mm frame of dimensions: 10.26 x 7.49 mm. That's easily visible, when taking a closer look at samples from Micro Four Thirds sensor.
This time I won't show you how bokeh changes. Instead, I've chosen a sharp and graphic subject to demonstrate how sharpness area changes.
Camera: Lumix G2
Mount: C-mount > Micro Four Thirds
Edit: PS CS6 50% scaling
Mount: C-mount > Micro Four Thirds
Edit: PS CS6 50% scaling
 |
| Meopta Openar 20/1.8 - @f1.8 |
 |
| Meopta Openar 20/1.8 - @f2.8 |
 |
| Meopta Openar 20/1.8 - @f4.0 |
 |
| Meopta Openar 20/1.8 - @f5.6 |
 |
| Meopta Openar 20/1.8 - @f8.0 |
 |
| Meopta Openar 20/1.8 - @f11 |
 |
| Meopta Openar 20/1.8 - @f16 |
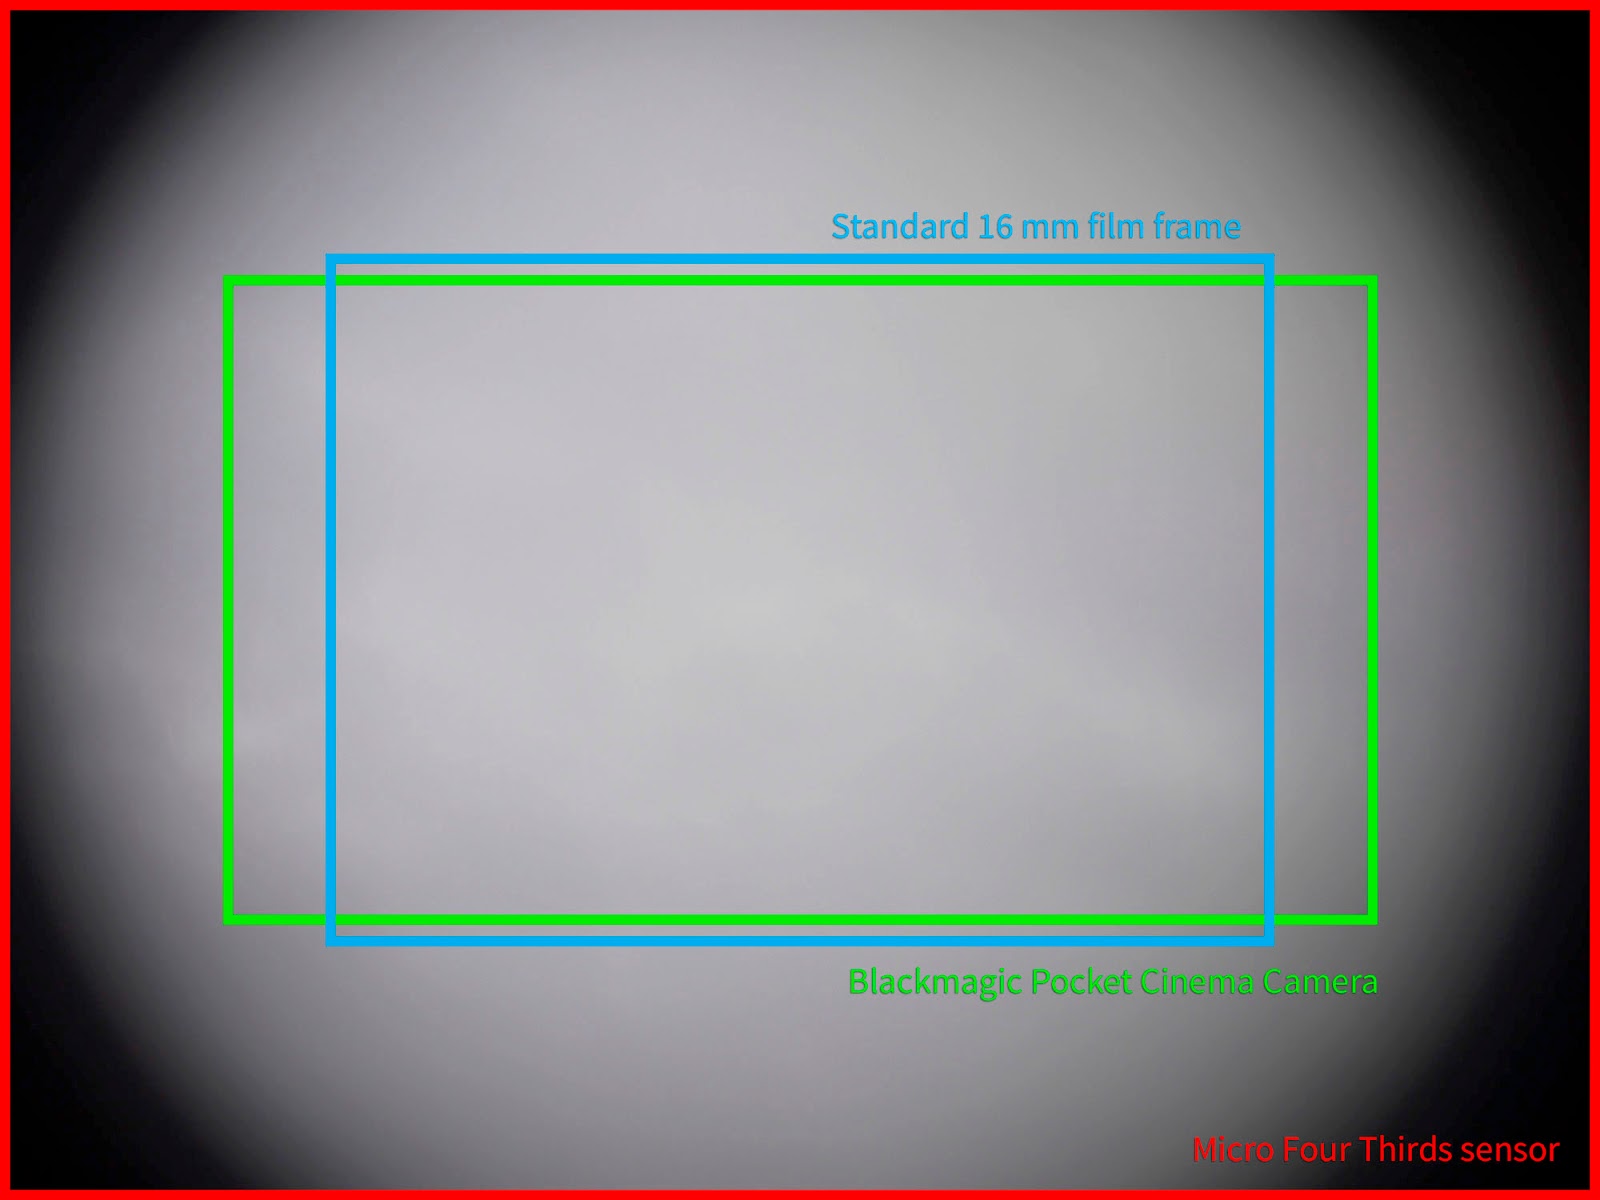
Capt. Obvious reports: Lens doesn't cover M4/3 sensor!
It vignettes heavily on every aperture The higher aperture value is, the less visible vignette becomes.
Vignetting isn't only visible as dark gradient, but also as image sharpness decrease away from centre. At f1.8 centre is the sharpest place, whereas edges are blurry. There's also heavy glowing effect affecting dark areas placed against light background.
Sharp area situation gets better with every step and glowing effect disappears at f2.8. I have an impression that at f16 glowing comes back a little bit, but not as heavy as at f1.8.
 |
| Meopta Openar 20/1.8 coverage: Micro Four Thirds (MFT, M4/3), Blackmagic Pocket Cinema Camera and Standard 16mm film frame |
For all those who uses Blackmagic Pocket Cinema Camera (BMPCC) other coverage area is important. The diagram above shows that you can use this lens without any worries about vignetting or coverage. Sensor will use the best crop. Good for you!
Meopta Openar 20/1.8 samples
I used various aperture settings, because 1.8 wouldn't be my first choice in most cases. During testing it turned out that for most purposes the "fastest" usable aperture you can get is 2.8. Unless you want glowing effect and lack of contrast.
However, close-ups with little highlights work very well at 1.8. That seems like the only opportunity to use it at its fastest.
 |
| Meopta Openar 20/1.8 - @f1.8 |
 |
| Meopta Openar 20/1.8 - @f1.8 |
 |
| Meopta Openar 20/1.8 - @f2.8 |
20 mm on M4/3 camera works as an eq. of 40 mm for full frame. That makes this lens hard to use for architecture. What bothers me is that purple tint in top right corner. I have no idea where it came from.
 |
| Meopta Openar 20/1.8 - @f4.0 |
As I warned you before - a lot of highlights at 1.8. end up with glowing effect and a lack of contrast.
 |
| Meopta Openar 20/1.8 - @f1.8 |
 |
| Meopta Openar 20/1.8 - @f2.8 |
 |
| Meopta Openar 20/1.8 - @f1.8 |
 |
| Meopta Openar 20/1.8 - @f2.8 |
 |
| Meopta Openar 20/1.8 - @f1.8 |
 |
| Meopta Openar 20/1.8 - @f2.8 |


Hi, thanks this is really a helpful article. I was looking for info about this lens for using with the new RaspberryPi HQ camera and this is precisely info I needed.
ReplyDelete